Raspberry Pi Webserver

The Need

We host free seminars on backup & recovery and virtualization each year.  We decided to lessen our paper dependency this year and provide the presentations via a pdf file instead of a printed booklet, as we had been doing for the past couple of years.

We wanted a solution that would easily serve files to people at our seminars.  Our options were to put the files on 1) thumbdrives, 2) an internet available server, 3) one of our laptops/phones/iPads running a webserver, ftp or some other means of filesharing, or 4) a dedicated device.  Also, we are limited on the amount of gear we can take on a trip, as we only have 2 suitcases for gear.  I’ll review the options, why I settled on the one I did, and how I configured it.

Option 1: files on a thumbdrive.  We could have put copies on thumbdrives and handed that out to everyone, but I wasn’t too keen on that due to price and hassle of keeping updated copies of presentations on large numbers of devices.  We do bring a handful of thumbdrives in case anyone has trouble downloading the file.

Option 2: internet available server. Easiest thing would be to have a page on our website and point people to it, updating the pdf for each city. However, internet access at hotels (where we do the events) is flaky at best, often non-functional. I do carry around a MiFi device to provide internet access in the event the hotel’s access is too horrible. However, our average attendance is 50 people and the average pdf size is about 50 MB, so that would be 2.5 GB of data downloaded in one city, at the painfully exorbitant prices that MiFi providers charge. And it is not unusual to be in a hotel where I can’t get any sort of MiFi signal, so I didn’t want us to be dependent on that.

Option 3: running something on laptop/iPad/Phone. This has the distinct advantage of not bringing another piece of equipment into play, as it would just run on one of our devices that we are already bringing. I didn’t really want to run a solution on multiple devices or have to worry about battery life/connectivity for iPads or phones, though I could have gotten around those. I really didn’t spend much time on this.

Option 4: dedicated device. This is what we settled on, though we struck out with our first device. I wanted something small and lightweight due to my luggage constraints. Our first attempt was with an iUSBport by HyperDrive. I created a webpage that had a link to the file and to pdf readers and put that and the pdf file on a usb drive and had a URL for people to access the file. We even wrote a script to simulate dozens of simultaneous downloads and thought we were good to go. As with many things, production use managed to bring out the worst and did not follow our testing experience. The iUSBport is strictly wireless, and though it was on a local network created by our cradlepoint router and users did not go out over the internet to access, it still ended up feeling like it was behind a dialup connection halfway around the world. That ended the use of the iUSBport.

Enter the Raspberry Pi

The Raspberry Pi is a credit card sized motherboard. Load the debian-based OS on an SD card, put it in a small case and you have a $60 webserver.  It weighs 2.6 oz and is 3.5″x2.5″x1″ in the case. It comes with 512 MB of RAM and a 700 Mhz ARM processor.

Raspberry PiRaspberryPibackside

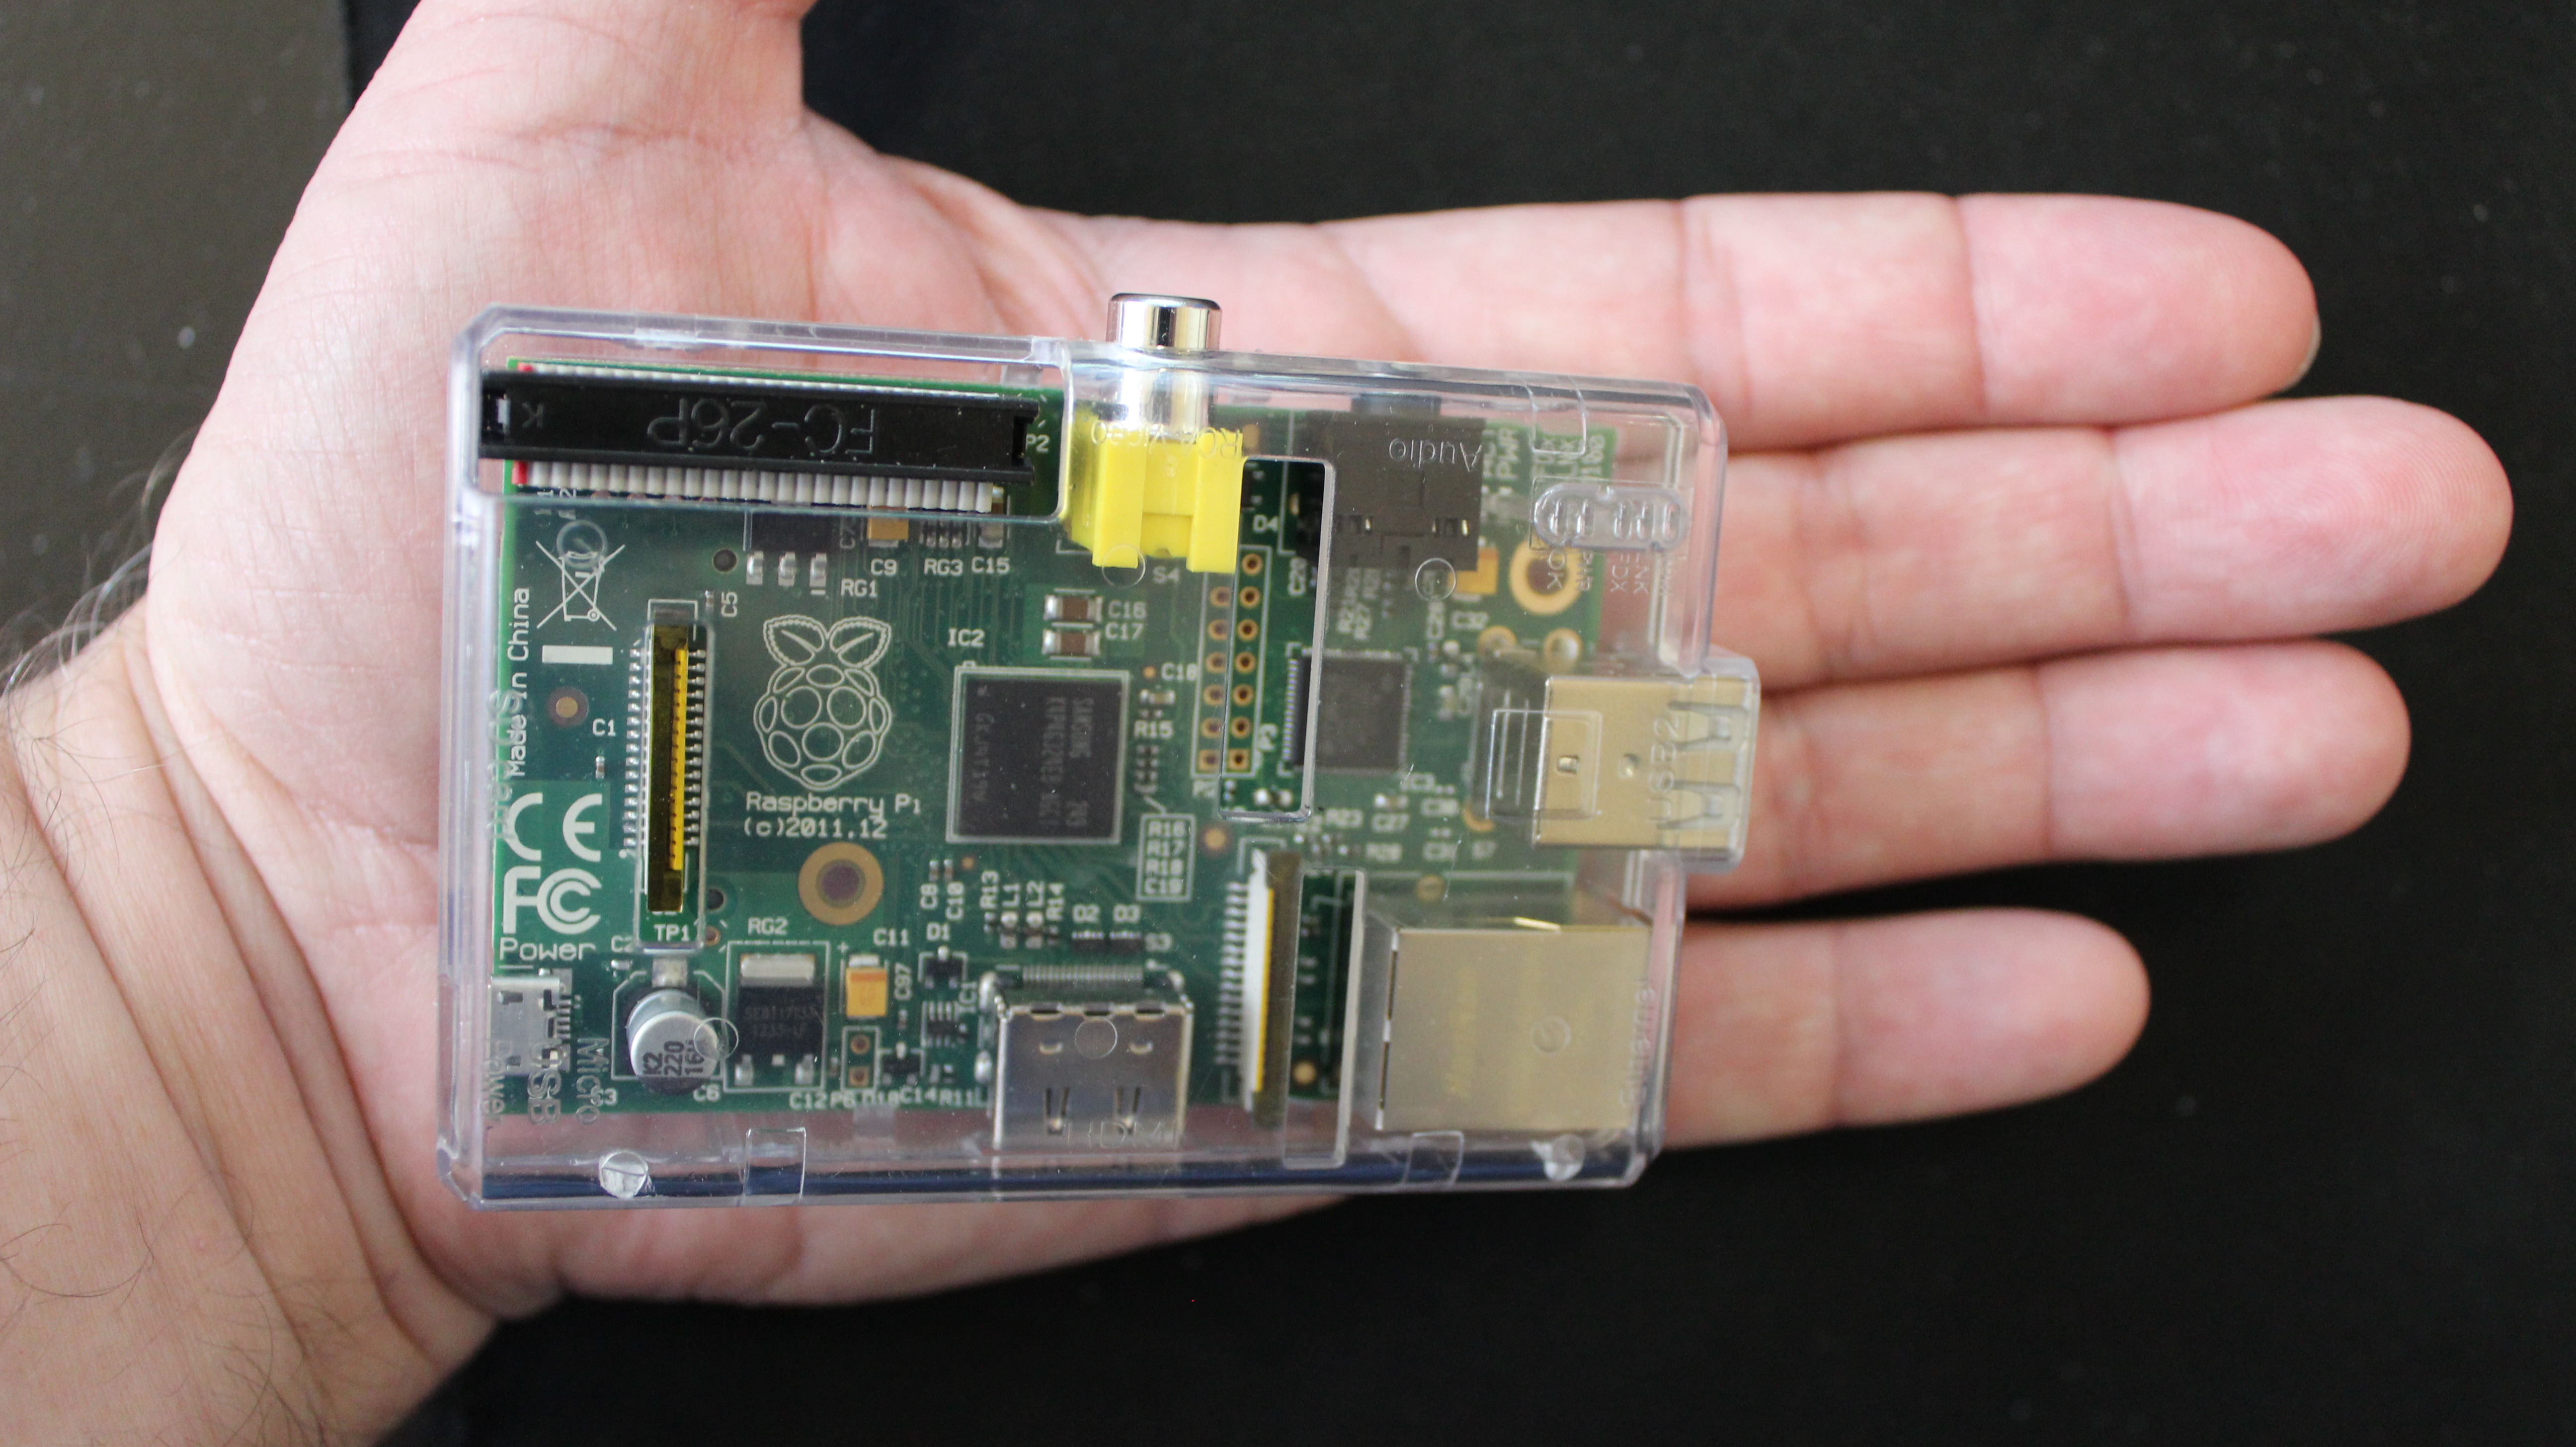
An SD card serves as the disk drive and we opted for the mini-SD card and converter, so that it would fit in the slot and not stick out of the case.

MiniSD-w-adapter

Configuring the Raspberry Pi as a webserver

I basically followed a modified version of this WikiHow, http://www.wikihow.com/Make-a-Raspberry-Pi-Web-Server.

There are guides and instructions on the download site in step 1 below; you will need to select which method works for you. My steps, run on my Mac, were:

NOTE: Don’t blindly follow the steps below and blame me if something goes wrong, you do need to understand what you are doing. For instance, using dd incorrectly can really mess things up, as it will rewrite all data on whatever target you specify. Follow the guide for beginners in the download link for detailed explanations.

  1. Download Raspbian “wheezy” http://www.raspberrypi.org/downloads
  2. unzip and dd image to SD card
    1. Used df -h to figure out correct disk name of SD card, removed s1 at end and replaced disk with rdisk
    2. unmounted SD card, sudo diskutil unmount /dev/disk2s1
    3. sudo dd if=2012-12-16-wheezy-raspbian.img of=/dev/rdisk2
  3. Either add sudo in front of each of these commands or run sudo su, then run each of these.
  4. mv /boot/boot_enable_ssh.rc /boot/boot.rc (enables ssh)
    dpkg-reconfigure tzdata
    apt-get -y update
    apt-get -y upgrade
    apt-get -y install ca-certificates
    apt-get -y install git-corewget http://goo.gl/1BOfJ -O /usr/bin/rpi-update && sudo chmod +x /usr/bin/rpi-update
    rpi-update
    shutdown -r now
  5. Next set need to be run with sudo as well
  6. apt-get -y install apache2 php5 libapache2-mod-php5
    groupadd www-data
    usermod -g www-data www-data
    groupadd www-data
    usermod -g www-data www-data
    service apache2 restart
  7. I then copied over the files I wanted to share to the webserver root and was ready to go

I also set a static IP, so that our documentation wouldn’t need to change, we simply point people to the 192.168 address that gets assigned by the cradlepoint router we use. For each city, I merely scp over the lastest pdf file.

For a backup, I pulled the SD card out of the Raspberry Pi, used dd to copy it over to my laptop, gzipped it up to take up less space and now have an image-based copy that I can dd onto a new SD card, complete with webserver and desired IP.

Summary

The Raspberry Pi has been a great solution for us.  It has a small price tag, weighs next to nothing, requires only a short ethernet cable for access and a short usb cable for power.  What more could I ask for?  (Don’t worry, I’ll think of something).

Advertisement

Russian Roulette Backup Policies

Are you playing Russian Roulette with your data? Many people are and may not even realize it. I actually think Russian Roulette is an acceptable policy, as long as you understand the consequences, which most people don’t.

In Russian Roulette, one takes a single bullet and puts it in a revolver, spins the cylinder, puts the gun to his head and pulls the trigger, thus a 1 in n chance of losing, where n is the number of chambers in the revolver (typically 6). Shouldn’t be necessary to explain the consequences.

However, it often is necessary to explain the consequences when playing Russian Roulette with data. In my view, you are playing Russian Roulette with your data when you have a weak, or untested, or non-existent backup plan. It’s not unusual to run across a company where backups were configured several years ago and no one has touched them since. There is no testing of restores to verify that backups are working, there is no sending of data to an offsite location or maybe just no visibility into how backups are running. No one will know how they are doing until there is a problem and the backups are needed, by which time it is too late.

The phrase Russian Roulette came to my mind over a dozen years ago, when, as a Sys Admin, I took a look at our backups and was a bit freaked out by what I saw. We had dozens of tape drives physically attached to larger servers and no barcodes on any of the tapes. A handful of operators would swap tapes out every morning, manually label the previous night’s tapes and put in new ones. For larger servers, they had to stand by during the backup to swap out tapes. It had evolved from simple, unplanned growth of a system that used to work fine many years before. As soon as I saw how these backups were running, I couldn’t stop seeing the image of Christopher Walken in The Deer Hunter, holding a gun to his head while his captor’s yelled “Mau”! I told my boss we were playing Russian Roulette and it was just a matter of time before we landed on the loaded chamber and we would be unable to recover data. We didn’t actually lose data, but it did take us more than a day to recover our primary database server after an incident, so we lost more money than we would have spent fixing our backups.

The importance of RTO and RPO

Let’s cover a couple key terms in backup and recovery, RTO and RPO.

RTO stands for Recovery Time Objective and is a measure of how quickly data must be restored. It actually refers to the maximum amount of time required to get the application back up to the point it was prior to whatever outage or problem suffered.

RPO is Recovery Point Objective and is a measure of how much data one can afford to lose, or how far back to go for a restore. If you do nightly backups, you have an RPO of approximately 24 hours.

So, designing a backup solution for your environment means determining what the appropriate RTO and RPO would be for your environment.

Most environments will have a mix of data, some very important data that has to be restored quickly (small RTO) and can tolerate no data lose (small RPO) and some data which can take hours or days to restore and can go back a day or two to the last good copy. To further complicate things, many end-users and business units can’t easily distinguish which data is more important that the rest, hence they are not sure what RTO/RPO to assign to their data.

To help sort this out, you need to ask the same questions multiple times in different ways. Basically, how much would it cost if we had to restore our data? Is it ok to get the data from an hour ago, a day ago, a week ago? How would we recreate the data if we couldn’t recover it at all? It may take some research to find these answers. Don’t settle for the easy answer of ‘we can’t lose any data ever and have to have it instantly restored’ (RTO/RPO of 0). That may be the case, but not usually. Most environments have a small percentage of data with RTO/RPO of zero, say 5-20%; and some environments have no data that fits that. It is more common to have data that can’t go back more than an hour, or 4 hours, than data that can’t go back seconds or minutes. If you really need aggressive RTOs or RPOs, then that’s fine, it just costs more to implement. Don’t go too far the other way and be complacent with your standard, once a day or once a week backup if you feel you have data that needs more protection.

Whatever solution you have in place, make sure you document what you have and what the limitations are of the current solution. Sure, you were told that you can’t offsite your backups because it would cost too much, but make sure it is documented and understood that if there is a problem with the data center, backups will be lost and data will be unrecoverable. Best that everyone understands the risks and accepts them in exchange for the cost savings, rather than finding out that the company is now out of business. I saw a data center taken out by a flooded toilet on a floor above; it happens.

So, why would Russian Roulette backups ever be ok?

I did start out saying that I think Russian Roulette can be an acceptable policy. It boils down to understanding the odds of losing data versus the cost of protecting that data. If you have data that is easy to replace or can afford to be offline for a while, or you won’t suffer a serious loss if it disappears all together, then Russian Roulette may be acceptable for you. Ask yourself what happens if the server turns into a molten pile of slag or if the data center becomes a smoldering hole in the ground. If that destroys your backups as well and you still stay in business, then you are fine. That isn’t the case for very many companies, but maybe it is for yours.

So, go head, spin the cylinder and pull the trigger. What’s the worst that could happen?

Do CIOs Get Backups?

Sitting in a press room listening to a panel at an industry event reaffirmed my skeptical view of management. I dunno, I guess I don’t really expect or want a CIO to know the nitty gritty about how their stuff is backed up, but I didn’t appreciate the responses that any of them made to the question ‘how are you backing up your virtual infrastructure?’.

Each of the CIOs from the keynote session gave weak answers. They would have been better off saying that they have not had a loss of data due to any failed restores rather than just making up stuff.

The first response was given with an accompanying look of confusion as to why the question would even be asked, ‘why, we merely replicate all our VMs, so there is no problem with restoring’. Ouch, where to start with that one. So, you can successfully restore your corrupt or deleted files that successfully replicated to your other site? Maybe there is more involved, maybe he meant to say that replication, on its own, is not a backup, so we use a CDP (continuous data protection) solution to capture all the changes and replicate those offsite. Or, we perform some form of snapshot and replicate that offsite. Without some form of rollback capability, replication may fail to restore you to the state you require. Replication, on its own, is not a backup solution, since any corruption or accidental deletion would simply get replicated.  As well, snapshots, on their own, are not a backup solution, since a loss of the appliance will mean a loss of the snapshots, so replicating those snapshots to another appliance is necessary.

The other response that got my hackles up was, ‘the beautiful thing about VMs is that they are ultimately just a single file, so it is really easy to just back that file up’. So, all of you who are experiencing challenges backing up your virtual environments must be missing out on that fact. They’re just files! They back up super easy! Right? Who says CIOs don’t have a sense of humor? If it were that easy, there would be no third party solutions needed and no agents or APIs for backup products, we would just perform regular file level backups with whatever backup product we have on hand.

I don’t recall the other responses, but they were equally useless. Again, silly to expect a CIO to know how things are done, but I thought that was why they were chosen for the panel, so they could explain how they are doing things with their virtual environments. You could look at it this way, they don’t know because there hasn’t been a problem restoring, so they haven’t needed to dwell on the how. Sure, let’s go with that.

Do You Buy Stuff Configured With The PSMO Option?

I was introduced to the concept of PSMO at a client a number of years ago.  He told me he hired me as a consultant to help him bypass the built-in PSMO feature (though he used a different letter than “S”).  I naturally asked him, “what in the world is PSMO?”  He told me that all software comes with the ‘Please Screw Me Over’ (PSMO) option enabled by default.  He expressed the opinion that you need to decipher the correct combination of configuration and/or licensing to get any product to actually work in a reasonably intelligent fashion.  And you people think I’m cynical!

I do have to agree that it often seems difficult to get software to work as you would expect, or figure out which of the numerous options you have to license to make things work like the sales guy told you it would.  I’ve done ROI’s that looked great until you added in the software license to enable one critical feature, after which you just couldn’t get people to even consider the solution due to the now exorbitant price.  While I understand the greed and avarice behind licensing prices (wasn’t it the Beatles who sang “All You Need is Cash”?), it does seem like they are trying to emulate Steve Martin’s pseudo philosophy on his Wild and Crazy Guy album.  To paraphrase Steve, these companies might say “this is what I’m shooting for – one sale, goodbye”.  Don’t get me started ranting about programmers creating programs that have complex configurations or options buried or obfuscated in some bizarre way.

At Tech Field Day 7, I heard some interesting comments from the sponsors that may indicate a growing tendency to move away from this long running problem of PSMO.  I’ll be blogging separately on the products that the sponsors talked about.  In this post, I’ll focus on the licensing side of PSMO, since we didn’t really get into configuration details.

Symantec

Symantec has bundled a number of their options with their Backup Exec appliance.  This should help simplify things.  Clients can be pushed from the appliance, which is a full media server.  I think it’s lame that Symantec didn’t include the Central Admin Server Option (CASO).  The assumption being that this appliance is for small environments, who may not need CASO, I suppose.  However, to keep from moving too far away from the PSMO philosophy, there is no ability to send to tape with this appliance and no RAID-6; so unless you’re ok with your appliance having a double-disk failure and losing *all* of the backups sent to that device, then you will need to have CASO to duplicate these backups to another media server to have a second copy on disk or tape (would have to be a regular media server not an appliance for the tape copy).  Fear not, I plan to cover these deficiencies more in another blog.

Symantec also covered their NetBackup appliance line.  The software and hardware licenses for these devices are separate on the NetBackup side, as opposed to the Backup Exec side having them tied together.  The nice part about the licensing here is that there is no additional software licensing for replication, simply add the hardware for another appliance.  Symantec moved to a capacity-based license several years ago, though not everyone knew about that when it came out.  In many cases, it is cheaper, and way easier, to have a capacity-based license.  You pay an amount based on how much data you are protecting in the environment and no longer care how many clients or options you need, they are all included.

Dell

Dell’s move away from PSMO is to have a perpetual license.  I wasn’t planning on blogging on this subject, so I didn’t really take detailed notes on licensing stuff.  I may have missed how far they are planning on taking this.  I have written down that a licensed purchased for a Compellent array stays with you, even when you do a fork-lift upgrade to new hardware.  It is possible they will do this with all their hardware.  So, buy it once and it follows you forever, like rats following the Pied Piper.  That’s probably not a good image for licensing, so forget I said that.

Veeam

Veeam has a good approach on the licensing side of things.  They now have a single license for multi-hypervisor environments.  So, if I decide to start moving to a hypervisor other than the pervasive VMware (not that anyone would ever accuse VMware of moving to a more PSMO-like licensing scheme anytime recently), I can use my existing licenses to say move one of my servers from VMware to Hyper-V.

My Shining Ray of Darkness

I certainly could twist this to say that this is just an example of the fact that licensing prices are so over-inflated that they can easily afford to throw more crap in and it won’t cost them anything.  But, I won’t say that.  I did get the impression that the companies above are making a genuine effort to make your life easier and trying to provide PSMO-free products.  Making your life easier, after all, would have the benefit of you feeling more inclined to turn to them and buy more stuff.  I also think it’s ok to ask vendors for products that have the PSMO option disabled at time of purchase.

FCoTR Takes on TSA

I have proof there is a government conspiracy against Fibre Channel over Token Ring (FCoTR).  I arrived at the Austin airport Saturday morning.  I was minding my own business, as I always do, (unless, of course, I’m minding someone else’s) when the metal detector at security went off.  I never set that thing off, I’ve done this way too many times to forget some stupid thing that would set that off.  I pat myself down several times and still come up empty.  Since I’m still setting off the alarm on the detector, I get sent to the special cow pen for the full pat down procedure.

Here’s what they found in the bottom of one of the 20 pockets in my cargo shorts:

FCoTR can't get past TSA

Just an example of the conspiracy against FCoTR.  Don’t believe any claims that this is just a protocol issue, such as the token being passed down the wrong path or excessive delays in granting permission for transmission, those types of comments are just diversions funded by the Ethernet Lobbyists (aka Communists).

I’d like to point out that my reason for being harassed at the Austin airport was due to my attending Tech Field Day 7.  It was my first time attending and I had a blast.  I learned some good stuff and met a bunch of cool/geeky people, if you’ll pardon my putting those two terms together.  Stephen Foskett and Matt Simmons put on an excellent event.

P.S. My > 3 oz bottle of Maple Syrup, courtesy of Mr. Foskett, made it through TSA in my carry-on just fine, much easier than the little FCoTR pin.

Easy Hard Drive Upgrade with Mac

I’ve been limping along with my little 128 GB SSD drive on my MacBook Pro.  (That statement still seems odd to me considering that my first hard drive upgrade, ages ago, was to a 30 MB hard drive that my sister told me I’d never be able to fill.)  My kind boss felt sorry for me and sprang for a new, roomy drive.  I received my new 500 GB SSD drive and went straight to swapping hard drives, which was incredibly easy.  The steps I took were:  1. made sure my backups were current, 2. swapped hard drives, 3. restored my OS using Time Machine, 4. reinstalled my Windows Boot Camp using Winclone and then 5. checked to make sure everything was working.

Step 1: Ensure Backups are Current

This could be as simple on a Mac as clicking on the Time Machine symbol on your menu bar:

I have an external drive plugged in, so backups are updated every hour.  I verified that mine was only a few minutes old, then checked on my external drive for a current Winclone backup of Windows running on Boot Camp and then verified that I had an up-to-date backup with CrashPlan, ’cause I’m just that paranoid.

Step 2: Swap Hard Drives

I use ifixit.com for things like this, they have nice step-by-step instructions, complete with pictures.  For my laptop, I used this guide, http://www.fixit.com.

The oddest thing I ran across was the bizarre screws (Tri-wing Y1 screws) used to attach the battery, I’ve never seen them anywhere before.  Even my cool little screwdriver with combo phillips #00 and T6 torx bits doesn’t have that.

Moving slowly and being careful not to touch the motherboard (since I couldn’t remove the battery), it still only took me about 10 minutes to swap the drives.

Step 3: Restore OS with Time Machine

This part is super easy, only made difficult by the fact that we have 4 different MacBook Pros in our office and, apparently, they each have their own distinct install disc.  Yes, this could have been made a non-issue by taking 10 seconds to use a sharpie and write some comments on each disc.  Since we didn’t do that, I grabbed what I thought was the most logical disk to use.  Silly me, thinking I could just use a Snow Leopard disc.

I did learn a new way to eject discs; when Command-E and the eject button don’t work, you can push the track-pad button while rebooting.  Turns out that rather than saying “this is the wrong disc, idiot”, Mac simply decides to keep the disc and not allow normal eject methods to work.  Kind of like what a London bank ATM did with my bank card after one failed PIN attempt.  Nice.

So, after finding my specific Mac OS X install disc, I did a boot to the disc, chose ‘Restore System from Backup’ from the Utilities menu, selected the backup volume and the Time Machine backup I wished to restore to (most recent).

It says 2 and a half hours in the picture above, but it turned out to only take about an hour and a half.  While this churned away, I got started on an all day patch extravaganza of our new HP Windows 7 laptop (for the new sales guy).

Step 4: Restore Boot Camp Partition with Winclone

I would have been done at this point, except that my Windows install uses Boot Camp.  I’ve been a fan of Winclone for a couple of years now, though it turns out they stopped development and decommissioned their website!  I understand someone has released an unofficial copy of Winclone 2.3, which is supposed to support Lion (I believe you can just edit the appropriate plist file to ignore the version check if you want to continue using Winclone 2.2).  See my side rant below.

To restore Windows, I opened the Boot Camp Assistant, told it I have the Mac OS X install disc, then chose Create or remove a Windows partition, and then set the partition size to 40 GB.  I did not format the drive, as Winclone will do this for me.

I’ve used Winclone before when increasing the size of my Boot Camp partition.  I simply blew away the partition with Boot Camp Assistant, increased the size, and then restored using Winclone.  I did the same thing here with my hard drive swap.  To perform the restore, you choose the restore tab, pick the backup file to restore to and choose the Boot Camp partition as the destination, unless you really want to repeat step 3 above.


Side Rant

I must have been snoozing or something, because I had no idea the developers of Winclone over at twocanoes.com were in trouble or were even considering abandoning Winclone, which they did sometime in 2010.  However sad that may be, why in the world did they just dump it?  Seems like it would have been just as easy for them to move it to source forge and turn it over to someone else.  I’m not aware of any program that replaces it, so it’s not like they gave up due to the competition.  So, my rant?  If you’re going to stop developing a free product that lots of people use, at least put it up on source forge and ask someone to take it over.  For me, moving forward, I figure it’s just as easy to simply dd the partition to an external drive.  That could even be scripted and run from cron.

Hmm, if only there were some site that would discuss how to do things like that, such as  backupcentral.com (this link points to an online version of the Linux and Windows Bare Metal Restore chapter I wrote in W. Curtis Preston’s book, Backup & Recovery).

Step 5: Verify Everything

It should be pretty obvious if the restore succeeded or not.  If things are all wonky and restoring to a different backup in Time Machine doesn’t work, then you will be stuck with a re-install of the OS, followed by restoring data from a backup (maybe the file restores will work from Time Machine or maybe you have another product grabbing files, like I do with CrashPlan).

For me, everything was working fine, except for a couple of things, one of which is minor, the other turned out to be a non-issue.  One was Microsoft Office and the other was my Parallels version of Windows.

Microsoft Office had two issues, a database index that it said it needed to rebuild, and a prompt requiring me to re-enter my product key.  Both of these were pretty minor, though still unexpected.

The other issue was Parallels.  I use Parallels to run my Boot Camp version of Windows as a virtual machine while running Mac OS.  However, after my recovery, there was no Parallels applications folder in my dock and the pvm file was missing to start-up the virtual machine.  There is an option within Parallels that says “Don’t backup with Time Machine” and I’m pretty sure I checked that way back when I set this up, since I’m using Winclone.  However, I’m not sure of that, and it’s not the default.  So, I simply went to CrashPlan to restore the pvm file, but discovered that it was 30+GB, which didn’t make sense, since it should just be a small file around 25 MB pointing to the Boot Camp location.  All I did was start-up Parallels, choose “New” and point it to the Boot Camp Partition, then I was back in business.

The nice thing about testing your restores with a hard drive swap is the built-in fallback should it have failed.  I could have gone back to my puny little 128 GB drive.  Good thing I didn’t have to do that!  Who lives with such small drives these days? ;)